

Traduções
Muito obrigada Evanescence!


Muito obrigada Inge Lore


TUTORIAL
MATERIAL
1 Tube principal e um floral (ou a escolha).
Mask: mask_befree_lu.
Perspective Shadow: shadow_befree_lu.
Selections: sel_bordabefree_lu / sel_faixabefree_lu.
Título: titulo_befree_lu.

PLUGIN
Xenofex –
Stamper.
Eye Candy 5 –
Perspective Tiling.
Corolaine and Sensibility - CS-HLines.
AAA Frames – Foto
Frame.
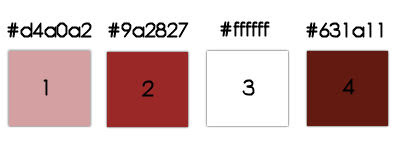
CORES
01- Abrir o material no PSP, duplicar e fechar o original.
02- Escolha as cores cores para trabalhar.
03- Formar um Gradiente > cor 1: #d4a0a2 (foregroud) – cor 2: #9a2827
(background) > Linear: Angule: 45
>
Repeats: 2 > invert: desmarcado.

04- Abrir uma imagem transparente de 800x500px.
Pintar com gradiente.
05- Effects > Plugin > Plugin Xenofex > Stamper.

06- Effects > Edges Effects > Enhance More.
07- Selection > Load/Save Selection >
Load Selection From Disk >
Selection: sel_faixabefree_lu.

08- Layer > Promoted Selection to Layer >
Selection > Selection None.
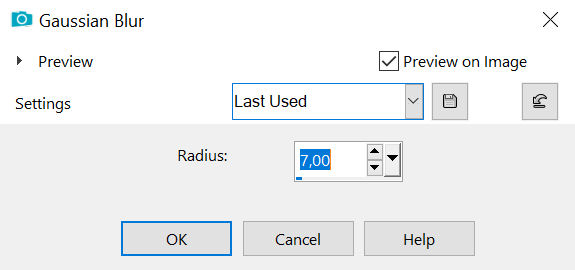
09- Adjust > Blur > Gaussiam Blur.

10- Effects > Distortion Effects > Pixelate.

11- Effects > Edges Effects > Enhance More.
12- Effects > Distortion Effects > Polar Coordinates.

13- Effects > Plugin > Alien Skin Eye Candy 5 >
Impact > Perspective Shadow.

(clicar 2 vezes sobre o present dentro da pasta de materiais para ser
direcionado ao User Settings ou importar via Manage)
14- Layer > New Raster Layer >
Pintar com a cor branca.
15- Layer > New mask layer > From image > Mask: mask_be_lu
(invert
desmarcado).
Layers > Merge > Merge Group
Blend Mode = Dodge
Opacity = 50%.
16- Formar um Gradiente > cor 3: #ffffff (foregroud) – cor 2: #9a2827
(background) > Linear: Angule: 45 >
Repeats: 2 >invert: marcado.

17- Layer > New Raster Layer >
Selection > Load/Save Selection >
Load Selection From Disk >
Selection: sel_bordabefree_lu.

Selection > Selection none.
18 - Adjust > Blur > Gaussiam Blur.

19- Edit > Copy no Tube Floral
>
Edit > Paste as New Layer.
Dê resize se necessário.
Posicione do lado esquerdo.
20- Effects > 3D Effects > Drop Shadow.

(ou a gosto)
21- Suas layers deverão estar nessa ordem.

22- Layer > Merge Visible >
Edity > Copy.
23- Image
> Add Borders:
1 px - simmetric - color: #d4a0a2.
3 px - simmetric - color: #9a2827.
1 px - simmetric - color: #d4a0a2.
Selection all.
24- Image
> Add Borders:
40 px - simmetric > qualquer
cor >
Selection > Invert.
25- Edit > Past as Into Selection.
Adjust >
Blur > Gaussiam Blur.
26- Effects > Plugin > Corolaine and
Sensibility >
CS-HLines.

Selection > Invert.
27- Effects >
3D Effects > Drop Shadow.

(ou a gosto)
Selection
> Invert.
28- Effects > Plugin > AAA Frames > Foto Frame.

Selection > Selection None.
29- Edit > Copy no Tube Principal
>
Edit > Paste as New Layer.
Dê resize se necessário.
Posicione do lado direito.
30- Effects > 3D Effects > Drop Shadow.

(ou a gosto)
31- Image
> Add Borders:
1 px - symmetric - color: #d4a0a2.
3 px - symmetric - color: #9a2827.
1 px - symmetric - color: #d4a0a2.
32- Edit > Copy no titulo_befree_lu
>
Edit > Paste as New Layer.
Ferramenta Pick Tool:
Position X 113
Position Y 106.

33- Effects > 3D Effects > Drop Shadow
Cor 4: #631a11.

34- Aplicar sua marca d'água ou
assinatura.
File > Export > JPEG Optimizer.
CRÉDITOS
Tube Principal: Ana Ridzi
Tube Floral: SuizaBella
Mask: Lu
Versão
Tube Principal: Ana Ridzi
Tube Floral: Nena Silva


Tutorial criado por Lu - Julho/2021
Não poderá ser copiado
sem consentimento prévio da autora.
Nenhum comentário:
Postar um comentário